If you’ve never tried your hand at beading, you may be feeling a little lost when faced with mountains of beads, pliers, wires, string, and rings. The great news is that learning how to bead for beginners is actually super simple and can be really rewarding from your first project!
Start out with beading 101
Beading as a craft can become incredibly complex and ornate, with some experienced beaders even creating elaborate 3D shapes. Fortunately, beading is also one of the more forgiving crafts to start out with — at the end of the day, you’re just threading beads onto some kind of material to make a continuous string. This string can then be closed with a loop ring, a knot, or a number of different techniques to become earrings, a key chain, a necklace — you name it! Once you have a few beading 101 skills under your belt, you’d be surprised at how quickly a simple string of beads becomes a much more complicated and impressive project.
So, are you ready to learn how to bead for beginners? Let’s get started!
Everything you’ll need for bead making for beginners
First thing’s first, it’s important that before you start out any project, you have the tools for the job. There are more tools you can use to get a professional finish, but here we’re focusing on the basics essential for any simple beading craft.
- Beads — OK, this might sound obvious, but there are a few things to consider when choosing the beads for your project. Size is an important element to take into account. Big beads require fewer to fill in a space or make a necklace, but they can also be heavier and may be less wearable as a result. Smaller beads will inevitably be cheaper, but they can also be more fiddly to thread, and require many more individual items to complete the same length.
Beginner beaders often underestimate how many beads they’ll need to finish a project. To avoid this, do some simple maths before you start. Measure the length of the jewellery you want to create, then divide that length by the width of your chosen individual beads. You only need a rough estimate for this, but you may be surprised at how many more beads are required to get the job done.
- String or wire — A nylon string, fishing or metal wire will be needed to actually thread your beads on.
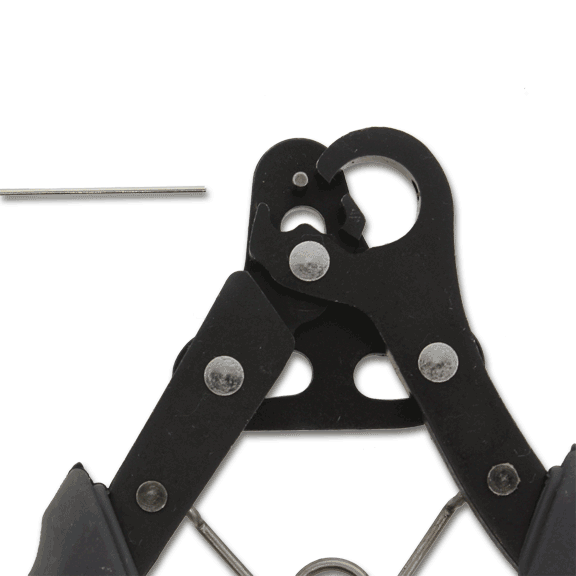
- Jewellery pliers — Jewellery pliers will be your best friend in the beading process, allowing you to manipulate closures and fastenings, hold things in position and have better control over small and finicky designs. You can choose from round nose, chain nose and flat nose pliers, so it might be worth asking your local bead shop for their advice on which pliers will suit your chosen beads and fastenings.
- Needles — If you’ve opted for a very thin wire or floppy string, you’ll probably find a needle is required to give you enough control and rigidity to get the beads onto their threading. Long beading needles also allow you to lay out portions of your design and make sure they’re right before you slide them onto your thread for the final design.
- Wire cutters or scissors — Your stringing material will dictate which one of these you choose, but sharp cutting implements that are suitable for your chosen material will save your nice fabric scissors from getting wrecked — all while giving you clean cuts for a more professional finish.
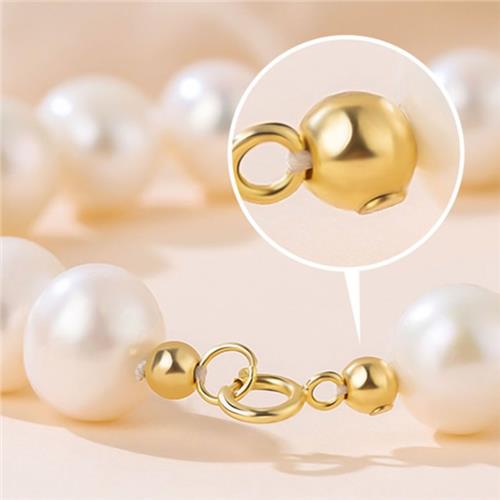
- Jewellery findings — This is a somewhat obscure name that means the fastenings, crimp beads or other coverings you will use to finish your piece and allow it to be taken on and off. Take into account your stringing materials when choosing these, and make sure that you select an appropriate fastening that can support the weight of your design.
- Storage — Finally, invest in proper storage for your beads and tools! A see-through hard case is a great option because it allows you to easily see what you have in your stash, while the rigid case will keep things from moving around. A disorganised craft station is a sure-fire way to feel overwhelmed and make mistakes in your project, so it’s well worth your while getting one of these.
Beading 101 — your very first project
Once you have all of your materials, you’re ready to start your very first project! A necklace or a bracelet is a great option for this because it only requires one thread and can be easily closed with a fastening of your choice. Plan out your design beforehand, so you have a rough idea of the materials needed, but don’t be afraid to experiment and go with the flow — sometimes, the beads will dictate their own design!
Lay out your materials in a clear and uncluttered workspace, and remember to enjoy the process, frustrations and all. If you do get stuck, a great tip is to research the technique or problem and watch a tutorial video — often, seeing something in front of your eyes is easier than reading about it. Before you know it, you’ll be beading with the best of them, as your confidence and skills grow.
Beads N Crystals — your go-to destination for beginner beading
No matter how large or small the project you’re attempting, at Beads N Crystals, you’ll find a huge range of tools and supplies to make it a success. We have a vibrant community of keen amateur and professional beaders, so you can stay in touch with the latest beading news and learn new techniques to improve your skills. If you’re ready to embark on your beading 101 journey, check out our affordable range of beads, gemstones and seed beads today, and start creating!

- Ultimate Guide to the Par Puca French Designer Beads Range - May 28, 2024
- Meet Travis, the New Wizard (sort of) at Beads N Crystals! - January 3, 2024
- Unveiling the Brilliance: Stainless Steel Findings and the Hypoallergenic Advantage - December 11, 2023